Readers of this blog will know that I am a fan of automating things using webhooks, and this goes for starting Qlik Automations among other things. Qlik are making a change to how their automations can be triggered though, which could break any webhook or REST API calls you may have to start automations. Read on to find out how you can fix these.
Why Use Webhooks To Fire Automations?
The ability to fire Qlik automations using a webhook is a very useful feature. The first thing it does is breaks the connection between the calling user and the user context of the automation. This means that a user can run a specific task within Qlik, without escalating their permissions, particularly helpful for allowing users to start reloads. It also allows for these automations to be started from a number of different places, as I recently described in my post Start a Qlik Sense Cloud Reload from a Webhook. This means that a reload can be started at the end of a SQL stored procedure as soon as it has finished prepping the data, from a browser bookmark, from a third-party tool (such as IFTTT) from another Qlik load script or even just a link copied and pasted into an email. For a number of clients I have set them up a web page with a number of reload buttons on, each of which fires a webhook to launch an automation, and the ability to add links to the Qlik Cloud Hub means the links can be placed there also.
What Is Changing and Why?
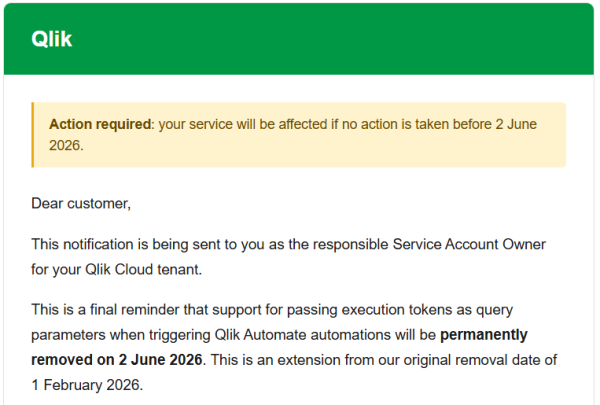
In order to fire a Qlik automation from a URL you need to provide the tenant name you are running on, a GUID for the automation and a token to prove that you have the rights to run the automation. It was possible to pass all of these things in a single URL, with the tenant and the automation GUID in the main part of the URL and the authorisation token going as a parameter. The ability to pass the authorisation token in the URL is being removed on the 2nd of June, and if you have called an automation in this way recently your tenant administrator will most likely have received an email like this one:
From this date, in order to make your automation trigger work correctly, the authorisation token will need to be passed as a header rather than as a parameter in the URL. The reasoning behind this is to comply with security best practice, as having the authorisation token in the URL means that it could get sniffed between where it is being called from and the tenant that is carrying out the action.
Further details on the change were posted back when it was originally proposed back at the start of the year:
Whilst the change is for perfectly valid reasons, it will mean that the webhooks will no longer natively support some of the use cases described above. There is a way around this for each of the ways that the webhook could previously have been called though, as follows.
Adding a Header to a REST Call in Qlik
To call webhook from within a Qlik load script a REST connection is required, and the URL is sent in a WITH CONNECTION statement. This technique can be useful for chaining reloads when you want to code some logic into the reload chain, perhaps only calling part of the reload if there is fresh data. Previously you could make the call with code like this:
LIB CONNECT TO '$(vLib)Generic GET';
let vTRSite = 'https://yourtenant.uk.qlikcloud.com/';
let vTRAuto = 'xxxxxx-xxxx-xxxx-xxxx-xxxxxxxxxx';
let vTRToken = 'xxxxxxxxxxxxxxxxxxxxxxxxxxxxxxxxxxxxxxxxxxxxxxxxxxxx';
let vTRApp = 'xxxxxxxx-xxxx-xxxx-xxxx-xxxxxxxxx';

TriggerReload:
SQL SELECT
   "status",
   "guid"
FROM JSON (wrap on) "root"
WITH CONNECTION (
URL "$(vTRSite)api/v1/automations/$(vTRAuto)/actions/execute?X-Execution-Token=$(vTRToken)&appguid=$(vTRApp)"
)
;
The connection made here is a REST connection of type GET, with the Allow WITH CONNECTION ticked. It doesn’t matter where the connection points to, but I tend to use https://jsonplaceholder.typicode.com/posts. The automation here receives the GUID of any app on the tenant and then kicks off a reload of that app.
The appguid can still remain as a parameter of the URL, but the token needs to move to the WITH CONNECTION block as a HTTPHEADER, as follows:
TriggerReload:
SQL SELECT
   "status",
   "guid"
FROM JSON (wrap on) "root"
WITH CONNECTION (
URL "$(vTRSite)api/v1/automations/$(vTRAuto)/actions/execute?appguid=$(vTRApp)",
HTTPHEADER "X-Execution-Token" "$(vTRToken)"
)
;
This simple change makes the call of the automation compliant with the new rules around calling automations.
Calling From A JavaScript Function
When calling from a JavaScript function it was possible to call everything with a single URL, with the whole URL in a variable called url, like this:
var xhttp = new XMLHttpRequest();
xhttp.onreadystatechange = function() {
   if (this.readyState == 4) {
      if (this.status == 200) {
         document.getElementById("spOutput").innerHTML = xhttp.responseText;
      } else {
   console.error('Error: ' + this.status);
   }
}
};

xhttp.open("GET", url, true);
xhttp.setRequestHeader('X-Execution-Token', token);
xhttp.send();
Again, it is a simple change to pass the token as a header, instead of in the URL. Place the token in a variable named token and remove the parameter from the url variable and then call like this:
xhttp.open("GET", url, true);
xhttp.setRequestHeader('X-Execution-Token', token);
xhttp.send();
By being able to trigger automations from JavaScript, all kinds of possibilities are available to you for building a UI for triggering reloads.
Adding a Browser Bookmark
Having a simple URL that can be called meant that triggers could be added to users’ browser bookmarks, giving a clean and simple way of starting automations. With the change to how these automations can be called breaking this approach, Dave Channon at Qlik has made available a nifty little app to create a bookmarklet to fire an automation.
Simply go to his JavaScript tool and fill in the details for your automation:
https://withdave.github.io/qlik/automate-bookmarklet-generator.html
Nothing needs to be sent back to the server, so your information does not leave your own browser. Once the details are plumbed in, JavaScript code is generated and can be dragged straight onto your bookmarks bar, or copied so you can paste it elsewhere. When called, the resultant page has the advantages of calling the automation directly and it opens a new tab giving a nicely formatted result back (that, and it will continue to work after June 2nd).
If you have a number of triggers that you need to create, these can be created in a folder on your bookmarks bar. That folder can then be exported from your browser and then imported into another browser. This way the triggers can be given to anyone that needs them.
Calling a Simple URL
The real beauty of how automations could be started previously was that a simple link could be pasted into an email, or set up in the Qlik hub, that could start the automation when clicked. In order that this functionality can be maintained, I have created a very simple tool to grab details from the parameters and then inject them into the call to the function. You can find this on GitHub here: https://github.com/steve-qi/qlik-auto. You can download this and host it wherever you want, or it can be called directly from my page.
To call it is simply a case of building the URL, as you would do with a direct call, just replace the placeholders with your details in this URL:
If you have extra parameters you need to add, then these can be passed in the ex parameter, as follows:
Note that with the extra parameter the equals symbol needs to be URL encoded to %3d.
The resultant link can then be sent to anyone that needs to start the automation, it can also be added to a link in the Qlik Cloud Hub, so reload links can be placed right next to the applications that they refresh.
This is not a recommended fix in any way, as it still has the original problem that the change is designed to get around, but it does mean that you can quickly replace any links that you currently have with a new URL whilst you come up with a more permanent solution.
Conclusion
Hopefully if you have been one of those that received an email advising that your automations would break you will be able to find a solution to this above. If not please comment below and let me know what the barriers to getting it working are. Or, if you have a technique that you would like to share, please post that in the comments also.


Leave A Comment